TrueSecure Guide
  • Getting Started
  • Backup Format Overview
    • Hybrid Backup
    • Object Lock (Immutability)
    • MS SQL Server Backup
    • MS Exchange Backup
    • Synthetic Backup
    • About GFS
      • Configure GFS Policy
        • GFS Retention Policy Settings in CLI
      • GFS Policy Usage Examples
      • F.A.Q
    • Forever Forward Incremental Backup
      • Intelligent Retention
    • Client-Side Deduplication
    • Mandatory and Full Consistency Checks
    • Retention Policy
    • File And Folder Backup
      • OneDrive Backup
      • System and Hidden Files Backup
    • Image-Based Backup
    • Full Backup Explained
    • VMware Backup Plan
      • Application-Consistent Backups
      • Pre-Freeze and Post-Thaw Scripts
      • Transaction Logs Processing in Application-Consistent Backups
      • Prepare Guest VM for Application-Consistent Backup
      • Changed Block Tracking for VMware Backups
    • About Hyper-V Backup
      • Hyper-V Virtual Machine Backup
      • Hyper-V Failover Cluster Backup
      • Application-Consistent Backups
      • Prepare Guest VM for Application-Consistent Backup
      • Changed Block Tracking for Hyper-V Backups
    • Legacy Backup Format
      • Backup Format Comparison
      • Hybrid Backup
      • Synthetic Full Backup (Legacy Backup Format)
      • Synthetic Backup for S3-compatible Storage Accounts
      • File-Level Backup (Legacy)
        • Step 1. Backup Route
        • Step 2. Backup Destination (for Local or Cloud Backup)
        • Step 3. Backup Destinations (for Hybrid Backup)
        • Step 4. Plan Name
        • Step 5. Advanced Options
        • Step 6. Backup Source
        • Step 7. Network Shares
        • Step 8. Advanced Filter
        • Step 9. Compression and Encryption Options
        • Step 10. Schedule
        • Step 11. Recurring Schedule
        • Step 12. Retention Policy
        • Step 13. Pre / Post Actions
        • Step 14. Email and System Log Notifications
        • Step 15. Summary
      • Image-Based Backup (Legacy)
        • Step 1. Backup Route
        • Step 2. Backup Destination
        • Step 3. Backup Destinations (for Hybrid Backup)
        • Step 4. Plan Name
        • Step 5. Select Partitions
        • Step 6. Advanced Options
        • Step 7. Compression and Encryption Options
        • Step 8. Retention Policy
        • Step 9. Schedule
        • Step 10. Specify Recurring Schedule
        • Step 11. Pre / Post Actions
        • Step 12. Notifications and System Log Settings
        • Step 13. Summary
      • VMware Backup (legacy)/Step 1. Select the Backup Route
        • Step 2. Select Backup Storage
        • Step 3. Specify the Plan Name
        • Step 4. Select VMware Host Server
        • Step 5. Select Virtual Machines
        • Step 6. Select Virtual Disks
        • Step 7. Compression and Encryption Options
        • Step 8. Retention Policy
        • Step 9. Schedule
        • Step 10. Schedule Full Backup
        • Step 11. Pre / Post Actions
        • Step 12. Notification
        • Step 13. Summary
      • Hyper-V VM Backup (legacy)/Step 1. Backup Route
        • Step 2. Select Backup Storage
        • Step 3. Plan Name
        • Step 4. Select Virtual Machines
        • Step 5. Select Virtual Disks
        • Step 6. Compression & Encryption Options
        • Step 7. Retention Policy
        • Step 8. Schedule
        • Step 9. Advanced Recurring Schedule
        • Step 10. Pre / Post Actions
        • Step 11. Notification
        • Step 12. Summary
    • Backup for Microsoft 365 / Google Workspace
      • Get Started with Backup for Microsoft 365 / Google Workspace
      • Manage Microsoft 365 Backup/ Service Dashboard
        • Account Settings
        • Manage Users
        • Create Mail Archive
        • Export to PST
      • Backup and Restore
        • Outlook Mail Backup
        • Back Up OneDrive
        • Contacts Backup
        • Back up Calendar
        • SharePoint Backup
        • Back up Microsoft Teams
        • Retention Policy in Microsoft 365 Backup
      • Google Backup/Account Setting
        • Manage Google Backup
        • Manage Users
        • Auto-Activate New Users
        • Backup and Restore
          • Back up Gmail
          • Item-Level Restore from Google Drive Backup
          • Back up Contacts
          • Back Up Calendar
          • Back Up Shared Drives
          • Retention Policy in Google Backup
  • Restore Backup Data
    • File-Level Restore
      • Step 1 - Select a Backup Storage
      • Step 2 - Specify the Plan Name
      • Step 3 - Select Data to Restore
      • Step 4. Select Restore Point
      • Step 5 - Select Files to Restore
      • Step 6. Destination
      • Step 7. Specify the Encryption Password
      • Step 8. Schedule Your Restore Plan
      • Step 9. Email Notifications and Event Log Settings
      • Step 10 - Check Network Shares
      • Step 11 - Save and Run Your Restore Plan
    • Image-Based Backup Restore
      • Step 1. Select Backup Storage
      • Step 2. Plan Name
      • Step 3 - Choose Data to Restore
      • Step 4 - Select a Restore Point
      • Step 5. Restore Type
        • Restore to Physical Disk
        • Restore to Virtual Disk
        • Restore to Amazon EC2 Instance, EBS Volume or AMI
          • Enable EC2 on your Amazon Account
          • Granting Required EC2 Permissions
          • Restore to Amazon EC2 Instance
          • Restore to Amazon Machine Image (AMI)
          • Restore to Elastic Block Store (EBS) Volume
        • Restore to Azure Virtual Machine or Data Disk
          • Restore to Azure Virtual Machine
          • Restore to Azure Data Disk
        • Restore to Google Cloud Instance, Image, or Disk
          • Restore to Google Cloud Instance
          • Restore to Google Machine Image
          • Restore to Google Data Disk
      • Step 6. Specify the Temporary Instance
      • Step 7. Select Partitions
      • Step 8. Destination
      • Step 9. Specify the Encryption Password
      • Step 10. Schedule Your Restore Plan
      • Step 11. Notifications and Logging
      • Step 12 - Check Network Shares
      • Step 13 - Save and Run Your Restore Plan
    • VMware Virtual Machine Restore Plan
    • Hyper-V Restore/Step 1. Select Backup to Restore
      • Step 2. Plan Name
      • Step 3. Type of Data
      • Step 4. Select a Restore Point
      • Step 5. Restore Source
      • Step 6. Restore Type
        • Select Virtual Disks
        • Restore Options (Destination)
        • Glacier Smart Restore (Optional)
        • Restore Virtual Machines As
      • Step 7. Encryption Options
      • Step 8. Schedule
      • Step 9. Pre-/Post Actions
      • Step 10. Notifications and Logging
      • Step 11. Check Network Shares
      • Summary
    • MS SQL Server Database Restore
      • Step 1 - Select a Backup Storage
      • Step 2 - Specify the Plan Name
      • Step 3 - Choose Data to Restore
      • Step 4. Select a Restore Point
      • Step 5. Select a SQL Server Instance
      • Step 6. Specify the Source Databases
      • Step 7 - Specify the Target Databases
      • Step 8 - Specify the Restore Options
      • Step 9. Specify the Encryption Password
      • Step 10. Schedule Your Restore Plan
      • Step 11. Customize Email Notifications and System Log Settings
      • Step 12 - Check Network Shares
      • Step 13 - Save and Run Your Restore Plan
    • MS SQL Server Backup Files Restore
      • Step 1 - Select a Backup Storage
      • Step 2 - Specify the Plan Name
      • Step 3 - Choose Data to Restore
      • Step 4. Select a Restore Point
      • Step 5. Specify the Source Databases
      • Step 6 - Specify the Restore Options
      • Step 7. Specify the Encryption Password
      • Step 8. Schedule Your Restore Plan
      • Step 9. Customize Email Notifications and System Log Settings
      • Step 10 - Check Network Shares
      • Step 11 - Save and Run Your Restore Plan
    • Microsoft Exchange Data Restore
      • Item-Level Restore in Microsoft Exchange
      • Restore Microsoft Exchange Files/Databases
        • Step 1 - Select a Backup Storage
        • Step 2 - Specify the Plan Name
        • Step 3 - Choose Data to Restore
        • Step 4. Select a Restore Point
        • Step 5 - Specify the Restore Destination
        • Step 6. Specify the Encryption Password
        • Step 7. Schedule Your Restore Plan
        • Step 8. Notifications and Logging
        • Step 9 - Check Network Shares
        • Step 10 - Save and Run Your Restore Plan
        • Update the Exchange Server Database
Powered by GitBook
On this page
  1. Backup Format Overview
  2. Legacy Backup Format
  3. VMware Backup (legacy)/Step 1. Select the Backup Route

Step 8. Retention Policy

PreviousStep 7. Compression and Encryption OptionsNextStep 9. Schedule

Last updated 11 months ago

On this wizard page you can choose whether the backup plan should use the global retention policy settings defined at the application level, or use individual retention policy.

Specifying Global Retention Policy Settings

You can specify a global retention policy for the entire application that will be applied to all newly created backup plans by default. To specify the global retention policy, switch to the Tools tab in the main application toolbar, click Options and navigate to the Retention Policy tab in the Options dialog that is invoked.

The following retention policy settings are available on this tab:

  • You can make a backup service delete versions of a disk image that were uploaded to your backup storage more than a certain number of days ago. When enabling this option, you can also make the backup service always keep the last version of each image regardless of when they were backed up.

  • You can specify the maximum number of versions that a backup service should keep in the storage for each image.

  • You can specify a time period for which locally deleted images should be maintained in the backup storage before being purged. After these images become removed from the backup storage, you will no longer be able to restore them.

In addition, you can specify separate retention settings applied for the history that TrueSecure Backup maintains on the History tab to keep track of any changes made to the local and target storages, as well as the local repository. The following retention policies are available for the backup history:

  • You can make the history keep records only for a certain period of time. Records will be deleted once they exceed the specified lifespan.

  • You can limit the maximum number of records that a history can maintain.

Specifying Custom Retention Policy Settings

You can make a backup plan use custom retention policy instead of using the default application's settings. The following retention policy settings are available on this wizard page:

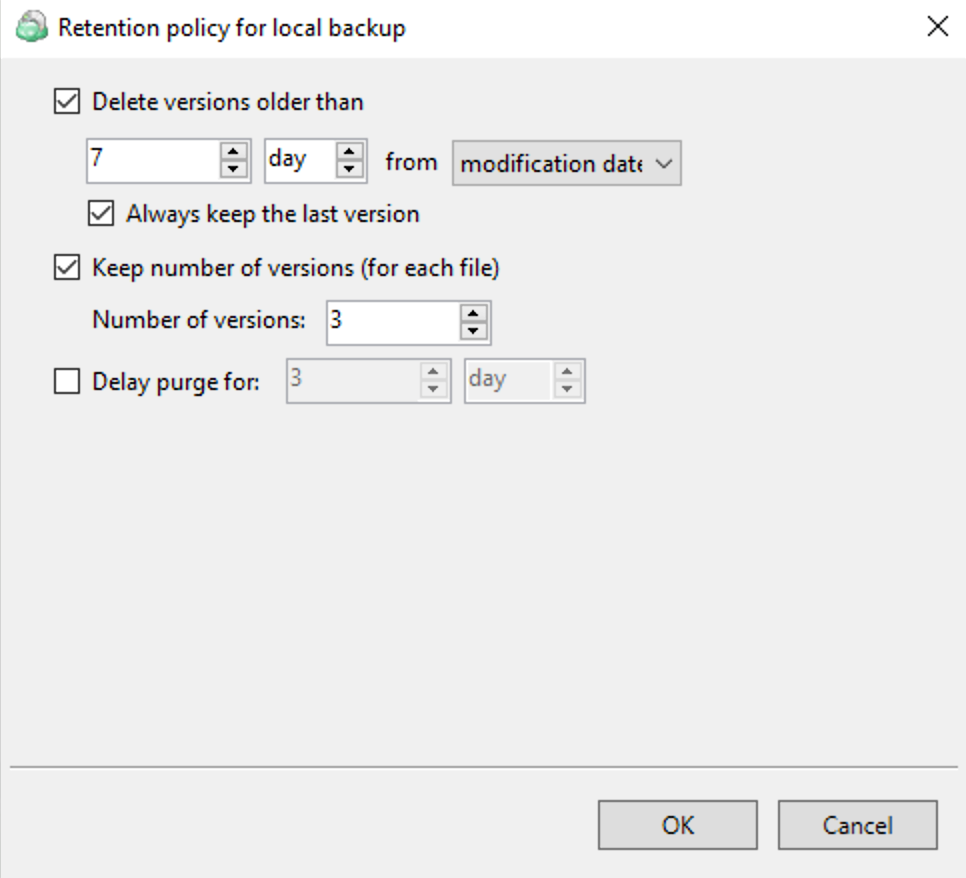
  • You can make a backup service delete versions of disk images that were uploaded to your backup storage more than a certain number of days ago. When enabling this option, you can also make the backup service always keep the last version of each image regardless of its modification or upload date.

  • You can specify the maximum number of versions that a backup service should keep in the storage for each file.

Configure Separate Retention Policy for Local and Cloud Storages

If you selected the Hybrid backup plan type, TrueSecure Backup allows you to configure a separate retention policy for both the local and the cloud storage. In this case the Retention Policy step of the Backup Wizard will feature a checkbox entitled Use different retention policy for local backup. Click it.

A retention policy configurator will pop up, enabling you to configure a separate retention policy for the local storage. When done, click OK.

From then on,TrueSecure Backup will apply different retention policies to both the local and the cloud storage during the plan execution.