TrueSecure Guide
  • Getting Started
  • Backup Format Overview
    • Hybrid Backup
    • Object Lock (Immutability)
    • MS SQL Server Backup
    • MS Exchange Backup
    • Synthetic Backup
    • About GFS
      • Configure GFS Policy
        • GFS Retention Policy Settings in CLI
      • GFS Policy Usage Examples
      • F.A.Q
    • Forever Forward Incremental Backup
      • Intelligent Retention
    • Client-Side Deduplication
    • Mandatory and Full Consistency Checks
    • Retention Policy
    • File And Folder Backup
      • OneDrive Backup
      • System and Hidden Files Backup
    • Image-Based Backup
    • Full Backup Explained
    • VMware Backup Plan
      • Application-Consistent Backups
      • Pre-Freeze and Post-Thaw Scripts
      • Transaction Logs Processing in Application-Consistent Backups
      • Prepare Guest VM for Application-Consistent Backup
      • Changed Block Tracking for VMware Backups
    • About Hyper-V Backup
      • Hyper-V Virtual Machine Backup
      • Hyper-V Failover Cluster Backup
      • Application-Consistent Backups
      • Prepare Guest VM for Application-Consistent Backup
      • Changed Block Tracking for Hyper-V Backups
    • Legacy Backup Format
      • Backup Format Comparison
      • Hybrid Backup
      • Synthetic Full Backup (Legacy Backup Format)
      • Synthetic Backup for S3-compatible Storage Accounts
      • File-Level Backup (Legacy)
        • Step 1. Backup Route
        • Step 2. Backup Destination (for Local or Cloud Backup)
        • Step 3. Backup Destinations (for Hybrid Backup)
        • Step 4. Plan Name
        • Step 5. Advanced Options
        • Step 6. Backup Source
        • Step 7. Network Shares
        • Step 8. Advanced Filter
        • Step 9. Compression and Encryption Options
        • Step 10. Schedule
        • Step 11. Recurring Schedule
        • Step 12. Retention Policy
        • Step 13. Pre / Post Actions
        • Step 14. Email and System Log Notifications
        • Step 15. Summary
      • Image-Based Backup (Legacy)
        • Step 1. Backup Route
        • Step 2. Backup Destination
        • Step 3. Backup Destinations (for Hybrid Backup)
        • Step 4. Plan Name
        • Step 5. Select Partitions
        • Step 6. Advanced Options
        • Step 7. Compression and Encryption Options
        • Step 8. Retention Policy
        • Step 9. Schedule
        • Step 10. Specify Recurring Schedule
        • Step 11. Pre / Post Actions
        • Step 12. Notifications and System Log Settings
        • Step 13. Summary
      • VMware Backup (legacy)/Step 1. Select the Backup Route
        • Step 2. Select Backup Storage
        • Step 3. Specify the Plan Name
        • Step 4. Select VMware Host Server
        • Step 5. Select Virtual Machines
        • Step 6. Select Virtual Disks
        • Step 7. Compression and Encryption Options
        • Step 8. Retention Policy
        • Step 9. Schedule
        • Step 10. Schedule Full Backup
        • Step 11. Pre / Post Actions
        • Step 12. Notification
        • Step 13. Summary
      • Hyper-V VM Backup (legacy)/Step 1. Backup Route
        • Step 2. Select Backup Storage
        • Step 3. Plan Name
        • Step 4. Select Virtual Machines
        • Step 5. Select Virtual Disks
        • Step 6. Compression & Encryption Options
        • Step 7. Retention Policy
        • Step 8. Schedule
        • Step 9. Advanced Recurring Schedule
        • Step 10. Pre / Post Actions
        • Step 11. Notification
        • Step 12. Summary
    • Backup for Microsoft 365 / Google Workspace
      • Get Started with Backup for Microsoft 365 / Google Workspace
      • Manage Microsoft 365 Backup/ Service Dashboard
        • Account Settings
        • Manage Users
        • Create Mail Archive
        • Export to PST
      • Backup and Restore
        • Outlook Mail Backup
        • Back Up OneDrive
        • Contacts Backup
        • Back up Calendar
        • SharePoint Backup
        • Back up Microsoft Teams
        • Retention Policy in Microsoft 365 Backup
      • Google Backup/Account Setting
        • Manage Google Backup
        • Manage Users
        • Auto-Activate New Users
        • Backup and Restore
          • Back up Gmail
          • Item-Level Restore from Google Drive Backup
          • Back up Contacts
          • Back Up Calendar
          • Back Up Shared Drives
          • Retention Policy in Google Backup
  • Restore Backup Data
    • File-Level Restore
      • Step 1 - Select a Backup Storage
      • Step 2 - Specify the Plan Name
      • Step 3 - Select Data to Restore
      • Step 4. Select Restore Point
      • Step 5 - Select Files to Restore
      • Step 6. Destination
      • Step 7. Specify the Encryption Password
      • Step 8. Schedule Your Restore Plan
      • Step 9. Email Notifications and Event Log Settings
      • Step 10 - Check Network Shares
      • Step 11 - Save and Run Your Restore Plan
    • Image-Based Backup Restore
      • Step 1. Select Backup Storage
      • Step 2. Plan Name
      • Step 3 - Choose Data to Restore
      • Step 4 - Select a Restore Point
      • Step 5. Restore Type
        • Restore to Physical Disk
        • Restore to Virtual Disk
        • Restore to Amazon EC2 Instance, EBS Volume or AMI
          • Enable EC2 on your Amazon Account
          • Granting Required EC2 Permissions
          • Restore to Amazon EC2 Instance
          • Restore to Amazon Machine Image (AMI)
          • Restore to Elastic Block Store (EBS) Volume
        • Restore to Azure Virtual Machine or Data Disk
          • Restore to Azure Virtual Machine
          • Restore to Azure Data Disk
        • Restore to Google Cloud Instance, Image, or Disk
          • Restore to Google Cloud Instance
          • Restore to Google Machine Image
          • Restore to Google Data Disk
      • Step 6. Specify the Temporary Instance
      • Step 7. Select Partitions
      • Step 8. Destination
      • Step 9. Specify the Encryption Password
      • Step 10. Schedule Your Restore Plan
      • Step 11. Notifications and Logging
      • Step 12 - Check Network Shares
      • Step 13 - Save and Run Your Restore Plan
    • VMware Virtual Machine Restore Plan
    • Hyper-V Restore/Step 1. Select Backup to Restore
      • Step 2. Plan Name
      • Step 3. Type of Data
      • Step 4. Select a Restore Point
      • Step 5. Restore Source
      • Step 6. Restore Type
        • Select Virtual Disks
        • Restore Options (Destination)
        • Glacier Smart Restore (Optional)
        • Restore Virtual Machines As
      • Step 7. Encryption Options
      • Step 8. Schedule
      • Step 9. Pre-/Post Actions
      • Step 10. Notifications and Logging
      • Step 11. Check Network Shares
      • Summary
    • MS SQL Server Database Restore
      • Step 1 - Select a Backup Storage
      • Step 2 - Specify the Plan Name
      • Step 3 - Choose Data to Restore
      • Step 4. Select a Restore Point
      • Step 5. Select a SQL Server Instance
      • Step 6. Specify the Source Databases
      • Step 7 - Specify the Target Databases
      • Step 8 - Specify the Restore Options
      • Step 9. Specify the Encryption Password
      • Step 10. Schedule Your Restore Plan
      • Step 11. Customize Email Notifications and System Log Settings
      • Step 12 - Check Network Shares
      • Step 13 - Save and Run Your Restore Plan
    • MS SQL Server Backup Files Restore
      • Step 1 - Select a Backup Storage
      • Step 2 - Specify the Plan Name
      • Step 3 - Choose Data to Restore
      • Step 4. Select a Restore Point
      • Step 5. Specify the Source Databases
      • Step 6 - Specify the Restore Options
      • Step 7. Specify the Encryption Password
      • Step 8. Schedule Your Restore Plan
      • Step 9. Customize Email Notifications and System Log Settings
      • Step 10 - Check Network Shares
      • Step 11 - Save and Run Your Restore Plan
    • Microsoft Exchange Data Restore
      • Item-Level Restore in Microsoft Exchange
      • Restore Microsoft Exchange Files/Databases
        • Step 1 - Select a Backup Storage
        • Step 2 - Specify the Plan Name
        • Step 3 - Choose Data to Restore
        • Step 4. Select a Restore Point
        • Step 5 - Specify the Restore Destination
        • Step 6. Specify the Encryption Password
        • Step 7. Schedule Your Restore Plan
        • Step 8. Notifications and Logging
        • Step 9 - Check Network Shares
        • Step 10 - Save and Run Your Restore Plan
        • Update the Exchange Server Database
Powered by GitBook
On this page
  1. Backup Format Overview
  2. Legacy Backup Format
  3. File-Level Backup (Legacy)

Step 6. Backup Source

PreviousStep 5. Advanced OptionsNextStep 7. Network Shares

Last updated 11 months ago

Specify files and/or folders to back up.

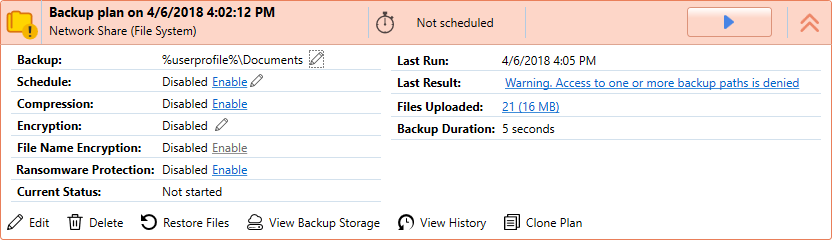
Please be informed that a backup will not be completed on encountering a user folder to which it has no access (when the privileges under which the backup service is running do not allow accessing this folder).

Consider running the backup service under different account to avoid such errors.

Clicking the burger icon on this wizard page invokes a menu where you can choose additional options.

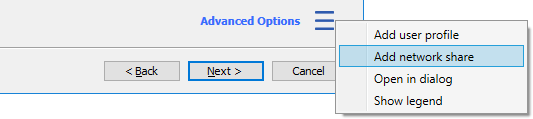
The following options are available on this menu:

  • Add user profile

    Use this option to include user folders in your backup (such as "Documents", "Downloads", or "Favorites").

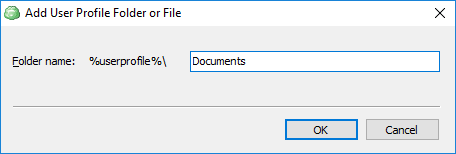
    A backup service can upload all user folders or only those available for the current user, depending on the user mode selected during TrueSecure Backup installation.

  • Add network share

    Opens a dialog window where you can specify the path to network share containing files that you wish to include in the backup.

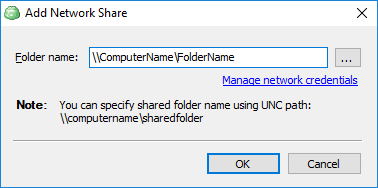
    In this dialog, you can specify user credentials used to access the network share. Alternatively, you can specify these credentials on the next wizard page.

  • Open in dialog Invokes a new dialog window displaying the file tree.

  • Show legend Invokes a dialog window explaining how to interpret the different states of check boxes in the file tree, as follows.

Check Box Appearance

Description

This folder with all subitems excluded. All new content will NOT be added

This folder with all subitems included. All new content will be added

Only selected items excluded. All new content in excluded folders will NOT be added

Only selected items included. New content will be added in selected folders only