TrueSecure Guide
  • Getting Started
  • Backup Format Overview
    • Hybrid Backup
    • Object Lock (Immutability)
    • MS SQL Server Backup
    • MS Exchange Backup
    • Synthetic Backup
    • About GFS
      • Configure GFS Policy
        • GFS Retention Policy Settings in CLI
      • GFS Policy Usage Examples
      • F.A.Q
    • Forever Forward Incremental Backup
      • Intelligent Retention
    • Client-Side Deduplication
    • Mandatory and Full Consistency Checks
    • Retention Policy
    • File And Folder Backup
      • OneDrive Backup
      • System and Hidden Files Backup
    • Image-Based Backup
    • Full Backup Explained
    • VMware Backup Plan
      • Application-Consistent Backups
      • Pre-Freeze and Post-Thaw Scripts
      • Transaction Logs Processing in Application-Consistent Backups
      • Prepare Guest VM for Application-Consistent Backup
      • Changed Block Tracking for VMware Backups
    • About Hyper-V Backup
      • Hyper-V Virtual Machine Backup
      • Hyper-V Failover Cluster Backup
      • Application-Consistent Backups
      • Prepare Guest VM for Application-Consistent Backup
      • Changed Block Tracking for Hyper-V Backups
    • Legacy Backup Format
      • Backup Format Comparison
      • Hybrid Backup
      • Synthetic Full Backup (Legacy Backup Format)
      • Synthetic Backup for S3-compatible Storage Accounts
      • File-Level Backup (Legacy)
        • Step 1. Backup Route
        • Step 2. Backup Destination (for Local or Cloud Backup)
        • Step 3. Backup Destinations (for Hybrid Backup)
        • Step 4. Plan Name
        • Step 5. Advanced Options
        • Step 6. Backup Source
        • Step 7. Network Shares
        • Step 8. Advanced Filter
        • Step 9. Compression and Encryption Options
        • Step 10. Schedule
        • Step 11. Recurring Schedule
        • Step 12. Retention Policy
        • Step 13. Pre / Post Actions
        • Step 14. Email and System Log Notifications
        • Step 15. Summary
      • Image-Based Backup (Legacy)
        • Step 1. Backup Route
        • Step 2. Backup Destination
        • Step 3. Backup Destinations (for Hybrid Backup)
        • Step 4. Plan Name
        • Step 5. Select Partitions
        • Step 6. Advanced Options
        • Step 7. Compression and Encryption Options
        • Step 8. Retention Policy
        • Step 9. Schedule
        • Step 10. Specify Recurring Schedule
        • Step 11. Pre / Post Actions
        • Step 12. Notifications and System Log Settings
        • Step 13. Summary
      • VMware Backup (legacy)/Step 1. Select the Backup Route
        • Step 2. Select Backup Storage
        • Step 3. Specify the Plan Name
        • Step 4. Select VMware Host Server
        • Step 5. Select Virtual Machines
        • Step 6. Select Virtual Disks
        • Step 7. Compression and Encryption Options
        • Step 8. Retention Policy
        • Step 9. Schedule
        • Step 10. Schedule Full Backup
        • Step 11. Pre / Post Actions
        • Step 12. Notification
        • Step 13. Summary
      • Hyper-V VM Backup (legacy)/Step 1. Backup Route
        • Step 2. Select Backup Storage
        • Step 3. Plan Name
        • Step 4. Select Virtual Machines
        • Step 5. Select Virtual Disks
        • Step 6. Compression & Encryption Options
        • Step 7. Retention Policy
        • Step 8. Schedule
        • Step 9. Advanced Recurring Schedule
        • Step 10. Pre / Post Actions
        • Step 11. Notification
        • Step 12. Summary
    • Backup for Microsoft 365 / Google Workspace
      • Get Started with Backup for Microsoft 365 / Google Workspace
      • Manage Microsoft 365 Backup/ Service Dashboard
        • Account Settings
        • Manage Users
        • Create Mail Archive
        • Export to PST
      • Backup and Restore
        • Outlook Mail Backup
        • Back Up OneDrive
        • Contacts Backup
        • Back up Calendar
        • SharePoint Backup
        • Back up Microsoft Teams
        • Retention Policy in Microsoft 365 Backup
      • Google Backup/Account Setting
        • Manage Google Backup
        • Manage Users
        • Auto-Activate New Users
        • Backup and Restore
          • Back up Gmail
          • Item-Level Restore from Google Drive Backup
          • Back up Contacts
          • Back Up Calendar
          • Back Up Shared Drives
          • Retention Policy in Google Backup
  • Restore Backup Data
    • File-Level Restore
      • Step 1 - Select a Backup Storage
      • Step 2 - Specify the Plan Name
      • Step 3 - Select Data to Restore
      • Step 4. Select Restore Point
      • Step 5 - Select Files to Restore
      • Step 6. Destination
      • Step 7. Specify the Encryption Password
      • Step 8. Schedule Your Restore Plan
      • Step 9. Email Notifications and Event Log Settings
      • Step 10 - Check Network Shares
      • Step 11 - Save and Run Your Restore Plan
    • Image-Based Backup Restore
      • Step 1. Select Backup Storage
      • Step 2. Plan Name
      • Step 3 - Choose Data to Restore
      • Step 4 - Select a Restore Point
      • Step 5. Restore Type
        • Restore to Physical Disk
        • Restore to Virtual Disk
        • Restore to Amazon EC2 Instance, EBS Volume or AMI
          • Enable EC2 on your Amazon Account
          • Granting Required EC2 Permissions
          • Restore to Amazon EC2 Instance
          • Restore to Amazon Machine Image (AMI)
          • Restore to Elastic Block Store (EBS) Volume
        • Restore to Azure Virtual Machine or Data Disk
          • Restore to Azure Virtual Machine
          • Restore to Azure Data Disk
        • Restore to Google Cloud Instance, Image, or Disk
          • Restore to Google Cloud Instance
          • Restore to Google Machine Image
          • Restore to Google Data Disk
      • Step 6. Specify the Temporary Instance
      • Step 7. Select Partitions
      • Step 8. Destination
      • Step 9. Specify the Encryption Password
      • Step 10. Schedule Your Restore Plan
      • Step 11. Notifications and Logging
      • Step 12 - Check Network Shares
      • Step 13 - Save and Run Your Restore Plan
    • VMware Virtual Machine Restore Plan
    • Hyper-V Restore/Step 1. Select Backup to Restore
      • Step 2. Plan Name
      • Step 3. Type of Data
      • Step 4. Select a Restore Point
      • Step 5. Restore Source
      • Step 6. Restore Type
        • Select Virtual Disks
        • Restore Options (Destination)
        • Glacier Smart Restore (Optional)
        • Restore Virtual Machines As
      • Step 7. Encryption Options
      • Step 8. Schedule
      • Step 9. Pre-/Post Actions
      • Step 10. Notifications and Logging
      • Step 11. Check Network Shares
      • Summary
    • MS SQL Server Database Restore
      • Step 1 - Select a Backup Storage
      • Step 2 - Specify the Plan Name
      • Step 3 - Choose Data to Restore
      • Step 4. Select a Restore Point
      • Step 5. Select a SQL Server Instance
      • Step 6. Specify the Source Databases
      • Step 7 - Specify the Target Databases
      • Step 8 - Specify the Restore Options
      • Step 9. Specify the Encryption Password
      • Step 10. Schedule Your Restore Plan
      • Step 11. Customize Email Notifications and System Log Settings
      • Step 12 - Check Network Shares
      • Step 13 - Save and Run Your Restore Plan
    • MS SQL Server Backup Files Restore
      • Step 1 - Select a Backup Storage
      • Step 2 - Specify the Plan Name
      • Step 3 - Choose Data to Restore
      • Step 4. Select a Restore Point
      • Step 5. Specify the Source Databases
      • Step 6 - Specify the Restore Options
      • Step 7. Specify the Encryption Password
      • Step 8. Schedule Your Restore Plan
      • Step 9. Customize Email Notifications and System Log Settings
      • Step 10 - Check Network Shares
      • Step 11 - Save and Run Your Restore Plan
    • Microsoft Exchange Data Restore
      • Item-Level Restore in Microsoft Exchange
      • Restore Microsoft Exchange Files/Databases
        • Step 1 - Select a Backup Storage
        • Step 2 - Specify the Plan Name
        • Step 3 - Choose Data to Restore
        • Step 4. Select a Restore Point
        • Step 5 - Specify the Restore Destination
        • Step 6. Specify the Encryption Password
        • Step 7. Schedule Your Restore Plan
        • Step 8. Notifications and Logging
        • Step 9 - Check Network Shares
        • Step 10 - Save and Run Your Restore Plan
        • Update the Exchange Server Database
Powered by GitBook
On this page
  1. Backup Format Overview
  2. Legacy Backup Format
  3. Hyper-V VM Backup (legacy)/Step 1. Backup Route

Step 8. Schedule

PreviousStep 7. Retention PolicyNextStep 9. Advanced Recurring Schedule

Last updated 11 months ago

Specify the schedule settings to make your backup routine run automatically.

You can choose among the following options:

  • No schedule (run manually)

    Select this option to disable automatic running of the backup routine.

  • Specific date

    Select this option to specify the date and time at which to run the backup process.

  • Recurring

    When you chose to save the restore plan earlier in this wizard, you can select this option to schedule your restore routine.

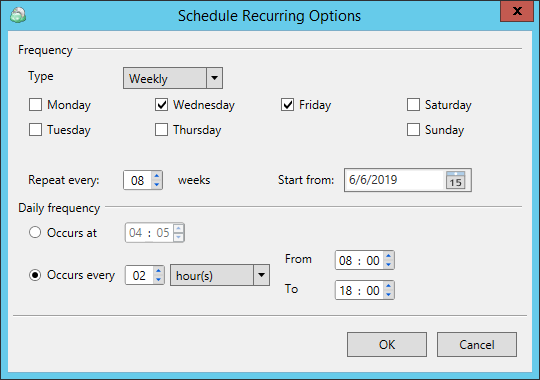
  • You can make the restore routine run on a daily, weekly, monthly or yearly basis and specify the additional settings, such as the time at which the restore process should start.

After choosing the appropriate scheduling settings, you can enable the following options:

  • Stop the plan if it runs for... Use this option to limit backup run time if you need to fit into maintenance window.

When enabling this feature, please be informed that TrueSecure Backup is unable to predict the backup time which may vary depending on a variety of factors, and premature termination of a backup process result in getting incomplete backup.

  • Run missed scheduled backup immediately when computer starts up. Select this check box if you want your backup plan will run automatically after your computer starts up if the backup plan was not implemented according to the schedule settings.

Click Next to proceed or Back to return to the previous step.