TrueSecure Guide
  • Getting Started
  • Backup Format Overview
    • Hybrid Backup
    • Object Lock (Immutability)
    • MS SQL Server Backup
    • MS Exchange Backup
    • Synthetic Backup
    • About GFS
      • Configure GFS Policy
        • GFS Retention Policy Settings in CLI
      • GFS Policy Usage Examples
      • F.A.Q
    • Forever Forward Incremental Backup
      • Intelligent Retention
    • Client-Side Deduplication
    • Mandatory and Full Consistency Checks
    • Retention Policy
    • File And Folder Backup
      • OneDrive Backup
      • System and Hidden Files Backup
    • Image-Based Backup
    • Full Backup Explained
    • VMware Backup Plan
      • Application-Consistent Backups
      • Pre-Freeze and Post-Thaw Scripts
      • Transaction Logs Processing in Application-Consistent Backups
      • Prepare Guest VM for Application-Consistent Backup
      • Changed Block Tracking for VMware Backups
    • About Hyper-V Backup
      • Hyper-V Virtual Machine Backup
      • Hyper-V Failover Cluster Backup
      • Application-Consistent Backups
      • Prepare Guest VM for Application-Consistent Backup
      • Changed Block Tracking for Hyper-V Backups
    • Legacy Backup Format
      • Backup Format Comparison
      • Hybrid Backup
      • Synthetic Full Backup (Legacy Backup Format)
      • Synthetic Backup for S3-compatible Storage Accounts
      • File-Level Backup (Legacy)
        • Step 1. Backup Route
        • Step 2. Backup Destination (for Local or Cloud Backup)
        • Step 3. Backup Destinations (for Hybrid Backup)
        • Step 4. Plan Name
        • Step 5. Advanced Options
        • Step 6. Backup Source
        • Step 7. Network Shares
        • Step 8. Advanced Filter
        • Step 9. Compression and Encryption Options
        • Step 10. Schedule
        • Step 11. Recurring Schedule
        • Step 12. Retention Policy
        • Step 13. Pre / Post Actions
        • Step 14. Email and System Log Notifications
        • Step 15. Summary
      • Image-Based Backup (Legacy)
        • Step 1. Backup Route
        • Step 2. Backup Destination
        • Step 3. Backup Destinations (for Hybrid Backup)
        • Step 4. Plan Name
        • Step 5. Select Partitions
        • Step 6. Advanced Options
        • Step 7. Compression and Encryption Options
        • Step 8. Retention Policy
        • Step 9. Schedule
        • Step 10. Specify Recurring Schedule
        • Step 11. Pre / Post Actions
        • Step 12. Notifications and System Log Settings
        • Step 13. Summary
      • VMware Backup (legacy)/Step 1. Select the Backup Route
        • Step 2. Select Backup Storage
        • Step 3. Specify the Plan Name
        • Step 4. Select VMware Host Server
        • Step 5. Select Virtual Machines
        • Step 6. Select Virtual Disks
        • Step 7. Compression and Encryption Options
        • Step 8. Retention Policy
        • Step 9. Schedule
        • Step 10. Schedule Full Backup
        • Step 11. Pre / Post Actions
        • Step 12. Notification
        • Step 13. Summary
      • Hyper-V VM Backup (legacy)/Step 1. Backup Route
        • Step 2. Select Backup Storage
        • Step 3. Plan Name
        • Step 4. Select Virtual Machines
        • Step 5. Select Virtual Disks
        • Step 6. Compression & Encryption Options
        • Step 7. Retention Policy
        • Step 8. Schedule
        • Step 9. Advanced Recurring Schedule
        • Step 10. Pre / Post Actions
        • Step 11. Notification
        • Step 12. Summary
    • Backup for Microsoft 365 / Google Workspace
      • Get Started with Backup for Microsoft 365 / Google Workspace
      • Manage Microsoft 365 Backup/ Service Dashboard
        • Account Settings
        • Manage Users
        • Create Mail Archive
        • Export to PST
      • Backup and Restore
        • Outlook Mail Backup
        • Back Up OneDrive
        • Contacts Backup
        • Back up Calendar
        • SharePoint Backup
        • Back up Microsoft Teams
        • Retention Policy in Microsoft 365 Backup
      • Google Backup/Account Setting
        • Manage Google Backup
        • Manage Users
        • Auto-Activate New Users
        • Backup and Restore
          • Back up Gmail
          • Item-Level Restore from Google Drive Backup
          • Back up Contacts
          • Back Up Calendar
          • Back Up Shared Drives
          • Retention Policy in Google Backup
  • Restore Backup Data
    • File-Level Restore
      • Step 1 - Select a Backup Storage
      • Step 2 - Specify the Plan Name
      • Step 3 - Select Data to Restore
      • Step 4. Select Restore Point
      • Step 5 - Select Files to Restore
      • Step 6. Destination
      • Step 7. Specify the Encryption Password
      • Step 8. Schedule Your Restore Plan
      • Step 9. Email Notifications and Event Log Settings
      • Step 10 - Check Network Shares
      • Step 11 - Save and Run Your Restore Plan
    • Image-Based Backup Restore
      • Step 1. Select Backup Storage
      • Step 2. Plan Name
      • Step 3 - Choose Data to Restore
      • Step 4 - Select a Restore Point
      • Step 5. Restore Type
        • Restore to Physical Disk
        • Restore to Virtual Disk
        • Restore to Amazon EC2 Instance, EBS Volume or AMI
          • Enable EC2 on your Amazon Account
          • Granting Required EC2 Permissions
          • Restore to Amazon EC2 Instance
          • Restore to Amazon Machine Image (AMI)
          • Restore to Elastic Block Store (EBS) Volume
        • Restore to Azure Virtual Machine or Data Disk
          • Restore to Azure Virtual Machine
          • Restore to Azure Data Disk
        • Restore to Google Cloud Instance, Image, or Disk
          • Restore to Google Cloud Instance
          • Restore to Google Machine Image
          • Restore to Google Data Disk
      • Step 6. Specify the Temporary Instance
      • Step 7. Select Partitions
      • Step 8. Destination
      • Step 9. Specify the Encryption Password
      • Step 10. Schedule Your Restore Plan
      • Step 11. Notifications and Logging
      • Step 12 - Check Network Shares
      • Step 13 - Save and Run Your Restore Plan
    • VMware Virtual Machine Restore Plan
    • Hyper-V Restore/Step 1. Select Backup to Restore
      • Step 2. Plan Name
      • Step 3. Type of Data
      • Step 4. Select a Restore Point
      • Step 5. Restore Source
      • Step 6. Restore Type
        • Select Virtual Disks
        • Restore Options (Destination)
        • Glacier Smart Restore (Optional)
        • Restore Virtual Machines As
      • Step 7. Encryption Options
      • Step 8. Schedule
      • Step 9. Pre-/Post Actions
      • Step 10. Notifications and Logging
      • Step 11. Check Network Shares
      • Summary
    • MS SQL Server Database Restore
      • Step 1 - Select a Backup Storage
      • Step 2 - Specify the Plan Name
      • Step 3 - Choose Data to Restore
      • Step 4. Select a Restore Point
      • Step 5. Select a SQL Server Instance
      • Step 6. Specify the Source Databases
      • Step 7 - Specify the Target Databases
      • Step 8 - Specify the Restore Options
      • Step 9. Specify the Encryption Password
      • Step 10. Schedule Your Restore Plan
      • Step 11. Customize Email Notifications and System Log Settings
      • Step 12 - Check Network Shares
      • Step 13 - Save and Run Your Restore Plan
    • MS SQL Server Backup Files Restore
      • Step 1 - Select a Backup Storage
      • Step 2 - Specify the Plan Name
      • Step 3 - Choose Data to Restore
      • Step 4. Select a Restore Point
      • Step 5. Specify the Source Databases
      • Step 6 - Specify the Restore Options
      • Step 7. Specify the Encryption Password
      • Step 8. Schedule Your Restore Plan
      • Step 9. Customize Email Notifications and System Log Settings
      • Step 10 - Check Network Shares
      • Step 11 - Save and Run Your Restore Plan
    • Microsoft Exchange Data Restore
      • Item-Level Restore in Microsoft Exchange
      • Restore Microsoft Exchange Files/Databases
        • Step 1 - Select a Backup Storage
        • Step 2 - Specify the Plan Name
        • Step 3 - Choose Data to Restore
        • Step 4. Select a Restore Point
        • Step 5 - Specify the Restore Destination
        • Step 6. Specify the Encryption Password
        • Step 7. Schedule Your Restore Plan
        • Step 8. Notifications and Logging
        • Step 9 - Check Network Shares
        • Step 10 - Save and Run Your Restore Plan
        • Update the Exchange Server Database
Powered by GitBook
On this page
  • Frameworks for Application-Consistent Backups
  • VMware Application-Consistent Backups
  1. Backup Format Overview
  2. VMware Backup Plan

Application-Consistent Backups

PreviousVMware Backup PlanNextPre-Freeze and Post-Thaw Scripts

Last updated 11 months ago

Application-consistent backups are used to back up entities with high or extremely high transaction loads. Good examples of such entities can be Microsoft SharePoint, Active Directory, MS SQL Server, or Oracle database solutions.

When such high-transactional solutions become subject to back up, the key point is the memory state and current transactions are stopped, flushed to disk, and only then are backed up.

If memory cannot be flushed to disk for some reason, backup may not be valid for restore or some important data may be missing.

Thus, an application-consistent backup is a backup that is equipped with tools to notify applications about coming backup operation and allow applications to achieve a quiescent and consistent state by flushing all operations to disk.

This chapter covers the following topics:

Frameworks for Application-Consistent Backups

Volume Shadow Copy Service (VSS) is a framework designed primarily to solve the application-consistent problems for Windows operating systems. VSS is an infrastructure that provides backup applications with the feature of creating application-consistent backups.

When backup job is initiated, VSS works as follows:

  1. Every running application that needs to flush its data kept in RAM to disk is notified by VSS.

  2. Then a Copy-On-Write operation is performed on volume.

  3. A volume snapshot is done and can be processed by a backup application.

VMware Application-Consistent Backups

Application-consistent backup of virtual machines on VMware environment is based on quiescence.

Quiescence

Quiescing is a process of bringing virtual machine file systems and application data to a consistent state. This is an important tool for correct application-consistent virtual machine backups.

To back up a currently running VM, quiescence is an efficient method. This concerns a virtual environment with highly-transactional applications (e.g. MS SQL Server or alike) since the safety of the application data is guaranteed by quiescence.

For consistent backup of virtual machines with no VSS support (Linux VMs), a crash-consistent quiescing is offered.

Also, quiescence suits to back up Microsoft Windows-based VMs with the built-in Microsoft VSS support. For these purposes, the VMware VSS component of VMware Tools is used.

Configure VMware Application-Consistent Backups

You can configure the application-consistent options on the Application Processing Options step of the VMware backup wizard. These options can be configured separately for each virtual machine.

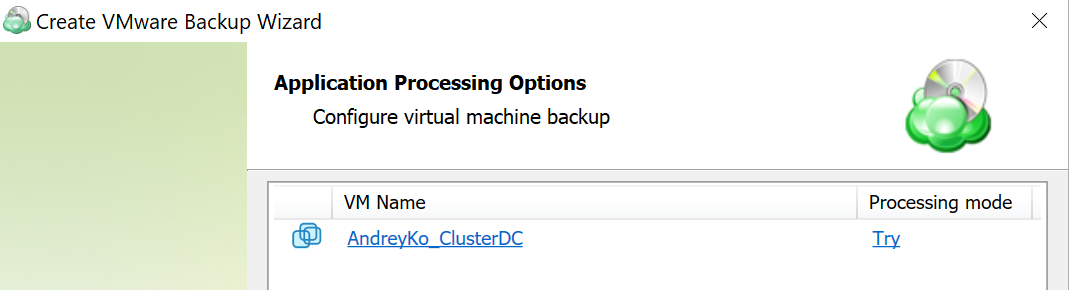
Click the application processing value to change it, if necessary.

By default, the Try application processing setting is set. You can change these options separately for each virtual machine, if necessary.

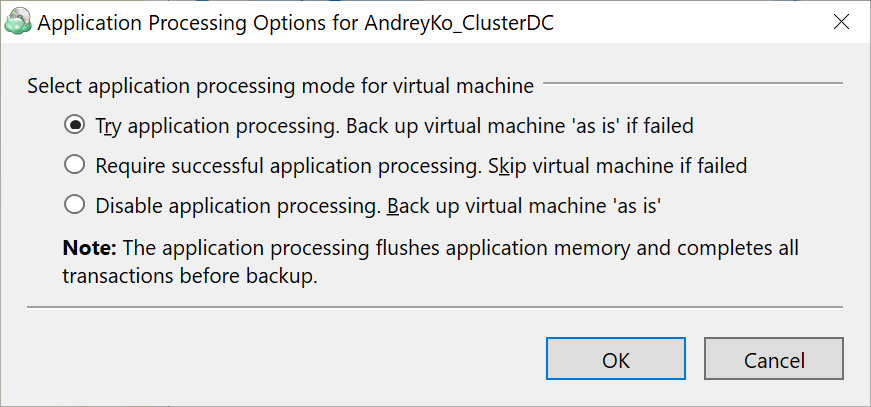
The following options are available:

  • Try application processing. Back up virtual machines 'as is' if failed. Once this option is selected, virtual machines are backed up one by one. Using the installed VMware Tools, the state of applications running on virtual machines is checked, then a snapshot is made and an application-consistent backup is performed. In case an application-consistent snapshot is not made for some reason, a regular snapshot is done for this virtual machine.

  • Require successful application processing. Skip virtual machines if failed. Once this option is selected, virtual machines with applications that did not flush pending I/O operations from memory to disks, are skipped and an appropriate warning is displayed for a user.

  • Disable application processing. Back up virtual machines 'as is'. Once this option is selected, regular VM snapshots are done without quiescing.

Note that the application-consistent backups are not supported on all guest operating systems. Read the article at kb.vmware.com to learn a list of operating systems that support application-consistent backups

To learn more, refer to chapter of the VMware documentation

Application-Consistent backups are unsupported in Linux virtual machine's (2044492)
Working with VSS
Frameworks for Application-Consistent Backups
VMware Application-Consistent Backups
Quiescence
Configure VMware Application-Consistent Backups